
Is your link to the Introduction of
"Sapphire Stars"
Is your link to Clue #1
Is your link to Clue #2
Let's all stand and applaud Heather of Peachy Pages
for her wonderful PDF skills!
I'd also like to thank my friend Ann of
for helping me design Sapphire Stars in EQ7!
We have finally made it to Clue #3!
I now have the permission from Alycia and Wendy, so we shall continue......LOLOLOLOL
Truly, I have loved seeing all of your progress with this mystery quilt!
Let's use #sapphirestarsmysteryquilt when using social media so we can all go to one place to view it.
My personal instagram is @photokevin74
In Clue #3, we will be using........

The Tri Recs Triangle Rulers
by Darlene Zimmerman
I personally feel it is good to have a plethora of useful
tools in my quilt making arsenal.
I use these tools A LOT due to their versatility.
Let's start out with a refresher's course in how
to use the Tri Recs Rulers, shall we?
I can't think of a better quilter to share with us
how to use these tools than the quilter that
taught me how to use them......
You guessed it..........
Bonnie Hunter!!!!!
Bonnie has given me permission to link to her very useful
tutorials on her website sharing how to use these rulers.
THANKS SO MUCH BONNIE!!!!!
PLEASE KEEP IN MIND
Bonnie is demonstrating in DIFFERENT unit sizes than we will be
using for our "Sapphire Stars" Mystery Quilt!
This is only for reference purposes!
After going to her video tutorial site, the link is below,
scroll down and select:
"Cutting With Tri Recs Rulers"
and
"Sewing Tri Recs Units"
To watch these videos,
CLICK
I hope you have watched Bonnie's video tutorials now.
If you haven't, please go and watch them.
We will wait for you.........
Welcome back from watching Bonnie's
helpful videos!
For Clue #3 we will be making:

48: 6 1/2" Tri Recs Units
using neutral backgrounds (triangles)
and
navy star points!
You will need to cut the following:
48: 6 1/2" neutral background triangles
48: navy 6 1/2" left side star points
48: navy 6 1/2" right side star points
You can do this by using 6 1/2" strips of fabric,
similar to the way Bonnie was using 3 1/2" strips
of fabric in her video tutorial
or......
you can use the rulers as templates like I did.
Allow me to demonstrate.....
How many of you have scraps in your stash that
you would consider odds and ends????

Perhaps like this?

As you can see.....the Tri Recs Ruler/template
fits on these oddly shaped scraps easily!
I am sure some of you are concerned about bias....
well, we are already going to be dealing with
bias using this tool as it is.
Just think in terms of depleting scraps
and using it all up!
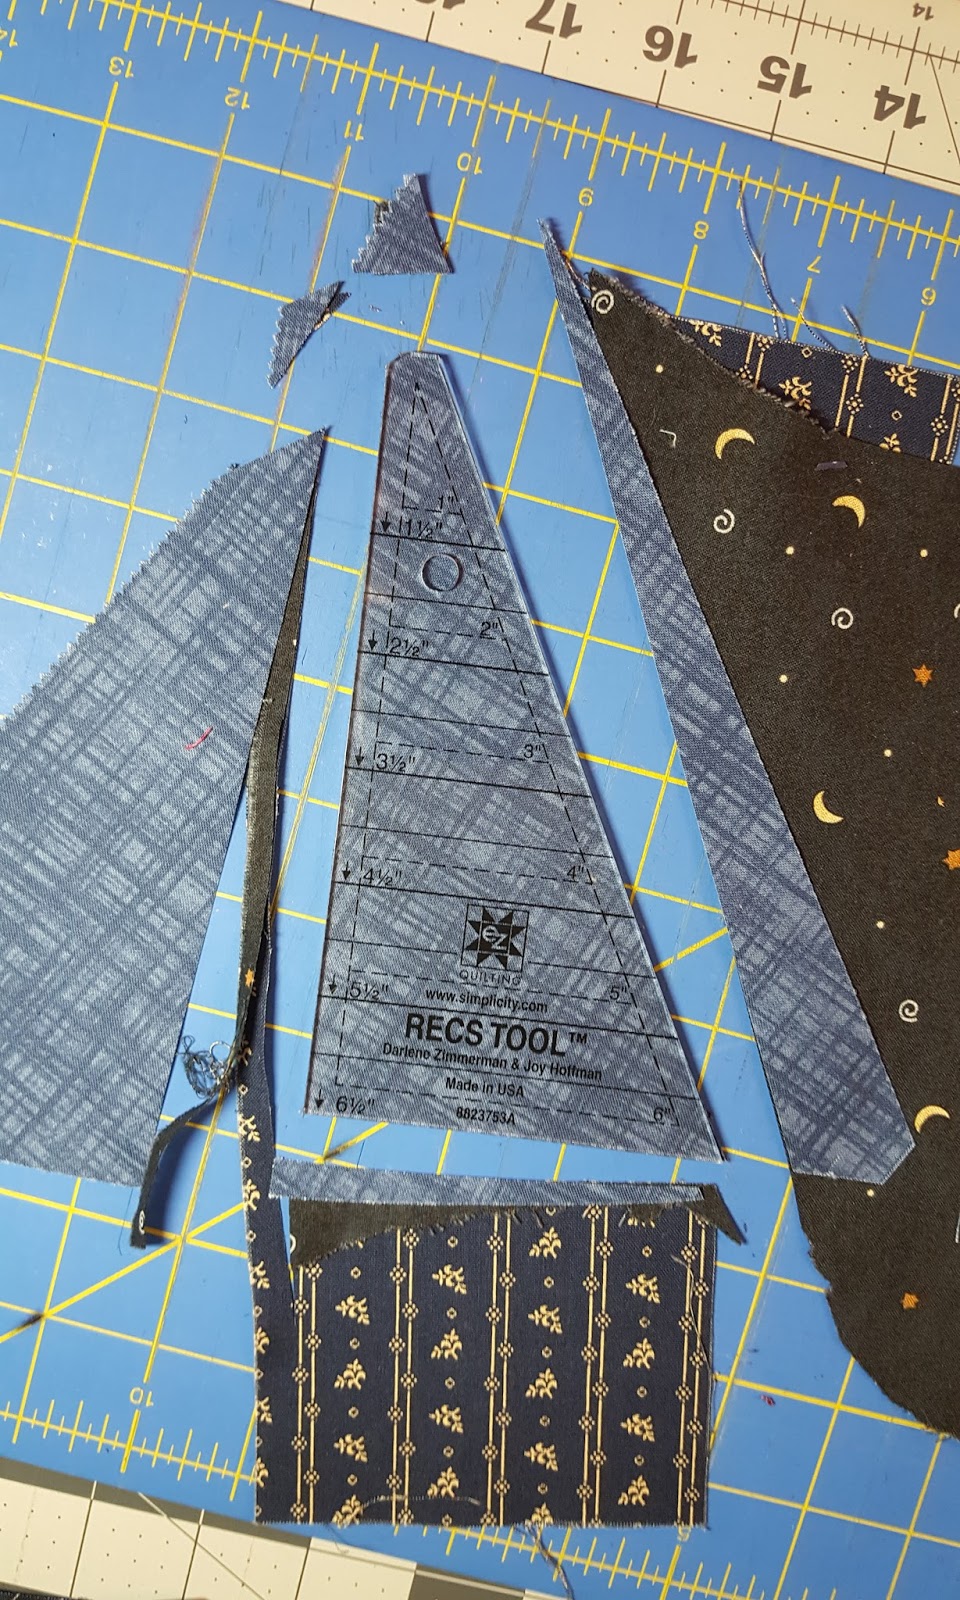
I use an old, smaller cutting mat so it is easy
to turn without having to move the fabrics
or rulers with each cut.
You could also use a rotating cutting mat,
I just need something a little larger for
myself.

I personally LOVE being able to use up scraps this way!
It adds so much variety to my scrap quilts.
It was my goal to make every piece different, and with this step,
believe it or not, I was able to use 48 different navy fabrics for
the left sided, and 48 different navy fabrics for the right sided star points!
OH YEAH!
REMEMBER!!!!!
The Tri Recs Ruler star point has to be placed upside down to make the left
The Tri Recs Ruler star point has to be placed upside down to make the left
sided star points. That is why I have 2 different piles of 48 different fabrics
in the photo above.
Let's go step by step, shall we?
Go through your scraps in the colors needed
with your rulers in hand
and match your Tri Recs Ruler/template to each scrap
making sure it will fit for cutting.
Press these fabric scraps before cutting.
I use a pressing agent such as Mary Ellen's Best Press.
It helps to keep the fabrics to "hold" together for
more accurate cutting......at least it does for me!
Here is a very special message concerning this clue
from
yours truly,
Uncle Kevin the Quilter.....
BE VERY CAREFUL CUTTING!!!!!!!
WATCH THOSE FINGERS!!!!!!!

Here, I am using odd and end scraps of neutral fabrics to
make the triangle backgrounds.
I feel comfortable cutting 5 layers at a time with my 60mm
rotary cutter.
By cutting in 5's, I can also keep track of the number of units I have
already cut.

Don't forget to cut off that tip at the top!

I turn the smaller cutting mat around in
order to obtain an accurate cut.
Don't forget to cut that bottom off either!
48 different neutral background triangles done in no time!
NEXT...........

.....on to those right sided star points.
Another stack of 5 different navy scraps
that will work!

Notice they are placed on a smaller
cutting mat that I can turn as I need to
in order to make the next cut.

Don't forget to cut that little notch!
It helps so much when aligning these units
when sewing!

Rotating the smaller mat as I cut.........
NOT moving the fabric or Tri Recs Ruler/template.

Isn't this fun??????
Who else uses these rulers as a template
so you can bust some scraps/stash???

And there ya go!
Another 5 units cut, just like that!
Obviously, I discard everything except those
cuttings on the right side....those are saved for
future scrap endeavors!
They will go into my blue crumbs bin.
REMEMBER!!!!!
Don't FORGET to turn the Tri Recs Ruler/template
Don't FORGET to turn the Tri Recs Ruler/template
UPSIDE DOWN when cutting for
the left sided star pieces!
Like so!
After cutting all of your pieces.....

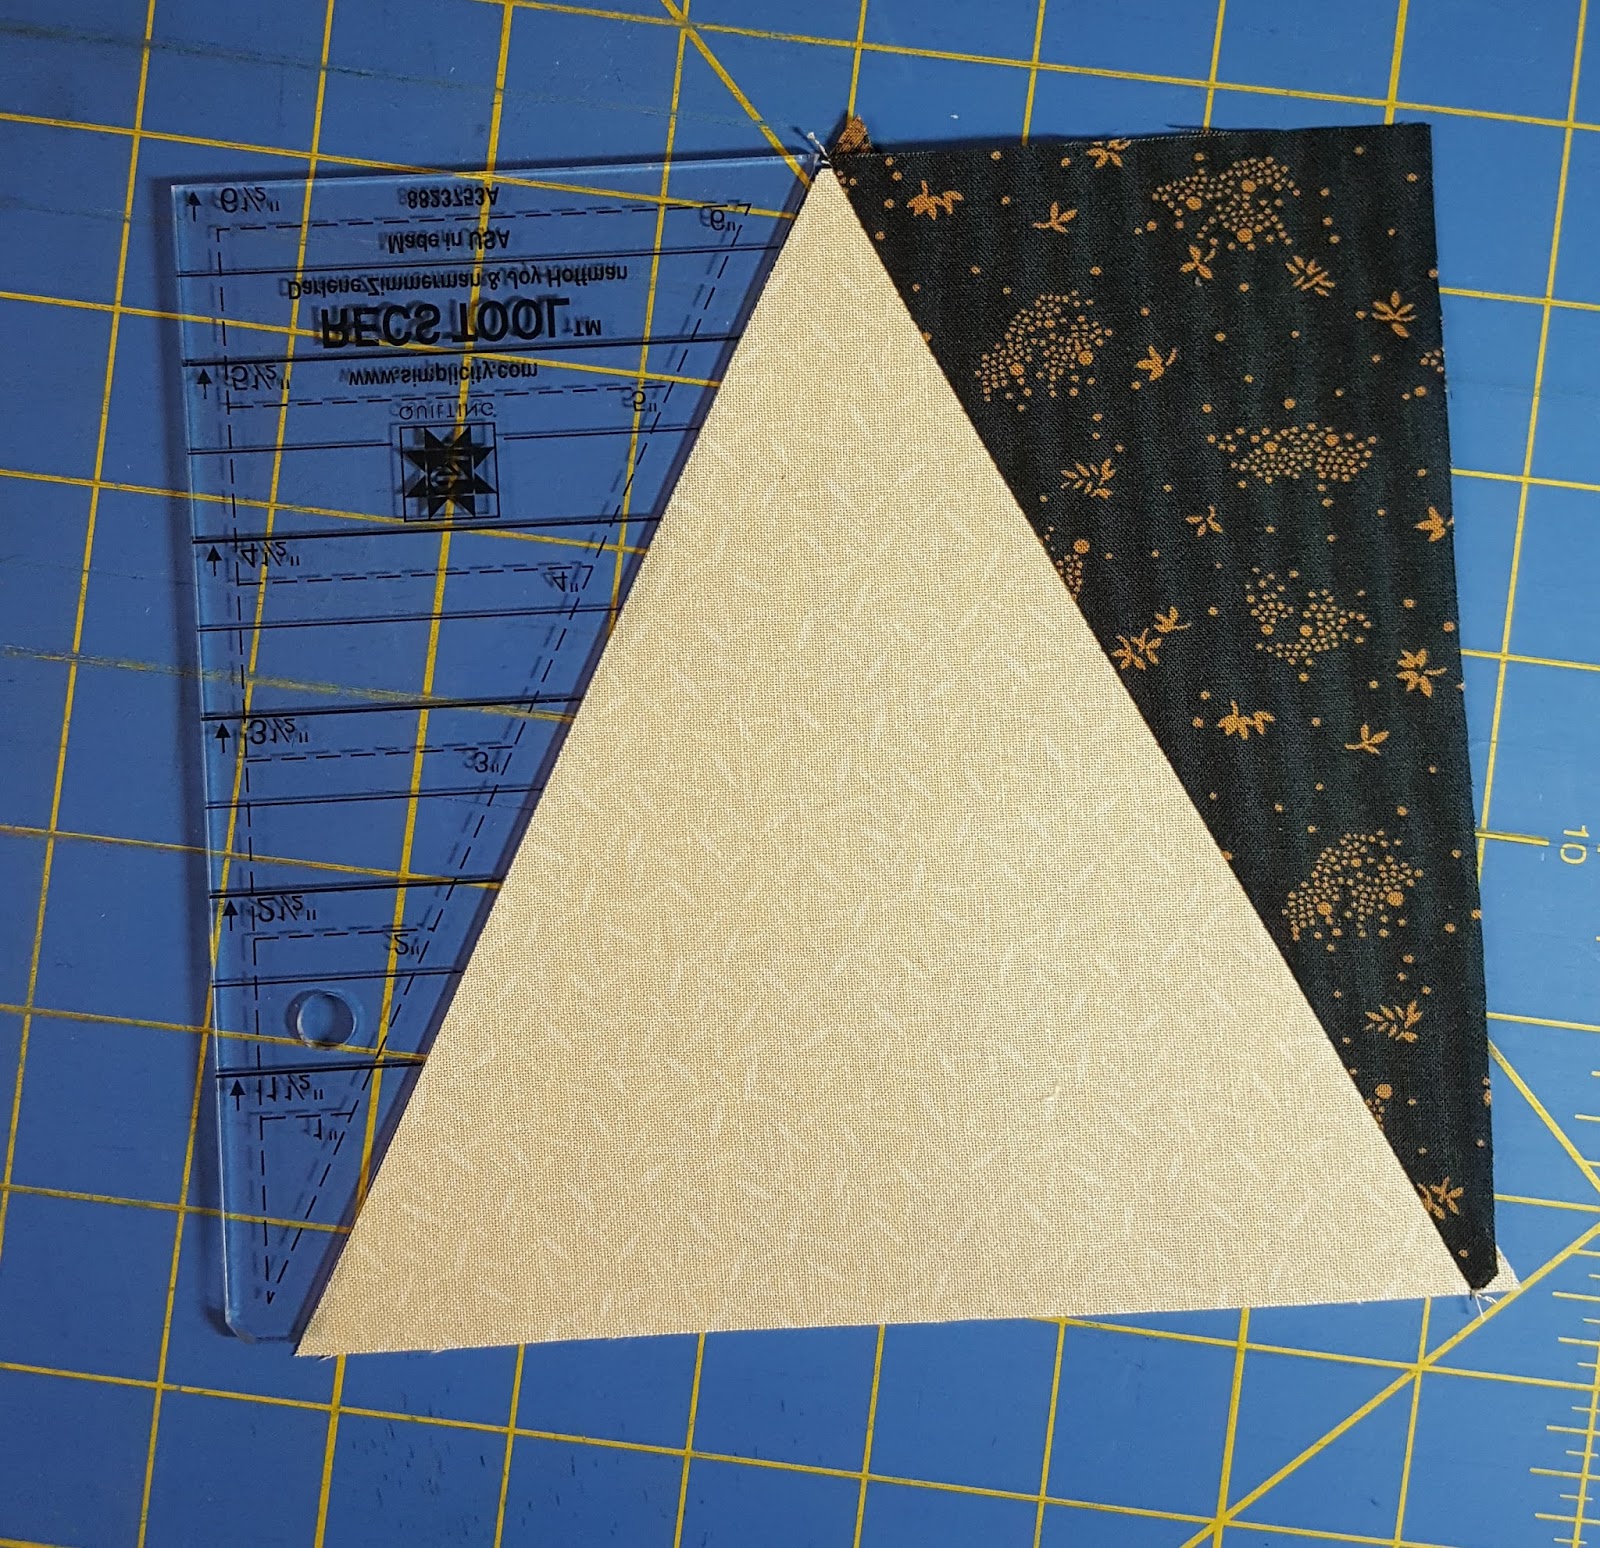
Go to your sewing machine and place your units like this.
This helps me keep things correct... sewing one side at a time.

As you will recall in Bonnie's demo, that notch is so important
in aligning these units correctly for sewing.
Like this!

Feed the units one by one through your
machine like this.
And, NO.......I am NOT ashamed to say
I use a seam guide! LOL
Since using one, my accuracy
increased so much!

Here is another view of a unit ready to go through the machine.
Sewing these units may feel strange to some of you who are new
because the star point exceeds the top of the background triangle.
But, that is the way it works.
I highly suggest you practice cutting a few, and sewing
a few before you dive into this clue.

Add the left sided star point and align
using the notch again.
Feed through the machine from that notch.
Feed through the machine from that notch.

Voila!
Here are some finished units!
The one on the left is before trimming dog ears.
The one on the right is after trimming dog ears.
Make sure to trim those dog ears off
when finished with this part of the clue!
If your cutting is accurate,
and
your 1/4" seam is accurate....
these units should be accurate!
And..................
there's one more little item we need to
do for Clue #3..........

Cut 24: 1 1/2" x 6 1/2" strips of Royal/Brilliant Blue
and
Cut 24: 1 1/2" x 6 1/2" strips of Light Blue
I may have a trick up my sleeve coming up sometime in
the near future.......
hmmmmm.......
perhaps a surprise clue of sorts????
Be ready!!!!!
You never know what I may do........
It's a MYSTERY!!!!!!
BWAHAHAHAHAHAHAHAHA
(Laughed in an evil scientist sort of way!)
As always, if you are more comfortable making these
units another way, I encourage you to do so.
Thanks for playing along!
Until next time,
Thanks for all of the encouragement!
Keep on Quilting!
Kevin the Quilter
I'm not even doing the mystery, Kevin, but I thoroughly enjoyed reading your very entertaining post! :)
ReplyDeleteNo PDF for Clue 3 ???? Or did I miss it somewhere ??
ReplyDeleteGive Heather a bit of time to make it
DeleteIt's looking pretty darn great!!!
ReplyDeleteLooking forward to seeing all the different versions come together.
ReplyDeleteI don't get accurate blocks with the tri-recs rulers no matter how careful I am, so I will use Deb Tucker's V Block ruler instead. It means some sliver trimming, but the blocks come out perfect.
ReplyDeletePat
I can hear that Vincent Price laugh from Maine! You are diabolical! I hope I can pull this off. I have been using the same ruler for 38 years. I have bought a few different rulers over the years, but I always end up donating them to my quilt group. I equate specialty rulers to my internet passwords. I know you are not supposed to use the same one for everything, but I find that if I change one, I can't remember where I put it or what it is for! I love watching Bonnie's videos even if I don't have the right ruler. I do want to clarify that those units are 6 1/2" at this stage so they will finish 6" - right? And, I know it must be an optical illusion, but it looks like you have on open cutter on your mat. I know that in real life you close it each time you set it down - right?? Thanks to you and Heather and Bonnie and all your helpers for clue #3. Have a super day!
ReplyDeleteHaha! You made me chuckle out loud with your laugh. :) Yes, I use rulers as templates all the time. Love the versatility. Great instructions here. Thanks again for leading a mystery for us that spurred me to start getting my scrap bins under control. And I still can't believe you focused on the one that needed it the most - so kind of you!
ReplyDeleteWow - these tri-rec units feel so HUGE after working with all those 3.5" units Bonnie loves so much! so far I have finished cutting all but the navy triangles.
ReplyDeleteI am super-LOVING these big patches!!
DeleteAnd I'm already behind. I've been sew busy, with deadlines, and paper piecing, that I haven't had a chance to do clue #2. I'll catch up sometime.....
ReplyDeleteLove the big blocks in clue #3. Can't wait for the surprise. I will be checking every day. Who doesn't love a good mystery!
ReplyDelete